DIY Sony SRS-GU10iP remote (RM-AS1iP) with Arduino
I’ve decided to create an IR remote for my speaker system. How hard could it be?
Introduction
I have a Sony SRS-GU10iP speaker bought at a thrift store some time ago. I’m happy with how it sounds, the only thing I missed is a remote control. The device itself supports IR remote (RM-AS1iP), but I didn’t have one. I’ve tried to look for one on eBay but they seem to cost more than I’ve paid for the speaker itself. My second thought was to get a universal remote and program it to work with SRS-GU10iP but after some research it seems that no universal remote would support it (at least with built in codes).
So I came up with the idea to create a remote myself. How hard could it be? As far as I understood I would just need to send proper binary codes with an IR diode and it should work fine. I had an Arduino nano and IR diode which I’ve salvaged from the old remote laying around, so I’ve decided to give it a try.
TLDR: If you don’t care about the story behind finding codes and came here only to get SRS-GU10iP / RM-AS1iP codes jump straight to: *RM-AS1iP Remote codes section*
Sending IR commands
To send IR command I would just have to turn it on and off again at certain points, which would then be interpreted as a command code by the speaker. I didn’t want to dive into details how do I have to turn diode to be then interpreted by the speaker, and only focus on the codes itself. So I’ve found a library to do that for me: https://github.com/z3t0/Arduino-IRremote. IRremote can send codes fo various devices including Sony which is just I’ve been looking for. It will send the signal (power the IR diode on and off) in proper frequency (40kHz for Sony) and timing. You can read more about the theory here: http://www.righto.com/2010/03/understanding-sony-ir-remote-codes-lirc.html
So to send IR commands I hooked up the IR diode to Arduino by connecting anode (+ side) to D3 pin of Arduino nano (you can find send pin in IRremote documentation) and cathode to GND. And then I’ve programmed Arduino with an example from IRremote library:
#include <IRremote.h>
IRsend irsend;

void setup() {
}
void loop () {
	unsigned long tData = 0xa90;
  for (int i=0; I < 3; i++) {
    irsend.sendSony(tData, 12);
    delay(40);
  }
  delay(5000);
}
This will send 0xa90 code every 5 seconds. It seems that Sony devices require that te code would be send at least 3 times, hence the for loop.
Notice the second argument to sendSony method - its 12 in the example as this is the default code length for Sony devices. We will get back to that later.
So now we have a remote which sends 0xa90 HEX command which corresponds to 2704 in decimal or 101010010000 in binary. Unfortunately my speakers don’t react to that as this is “Sony TV power on code” as I’ve found on the web. Now its time to find the codes which work for my device. If you are lucky (or just have a more popular device) you could find the codes in a web. For example lirc (Linux Infrared Remote Control) has a database with codes for various remotes. An example sony tv remote: http://lirc.sourceforge.net/remotes/sony/RM-ED006 where you can see 0xA90 as KEY_POWER.
Finding remote codes
I couldn’t find codes for RM-AS1iP on the web, so I’ve decided to try figuring out them on my own. I’d basically do something similar to what universal remotes do - iterate over codes until the device reacts. As you’ve seen before Sony (and most of other manufacturers) use the same protocol for all the devices, just the commands differ. So there was a good chance that if I iterate over commands from 0 to infinity, i’ll be able to find one that works!
But wait… infinity? Sony uses 12, 15 or 20 bit codes so i’ll limit myself to 20 bits which leaves 1048575 possibilities. Ok, let’s start with zero and go up. Arduino code would look something like this:
#include <IRremote.h>
IRsend irsend;

void setup() {
  Serial.begin(115200);
}

unsigned long tData = 0;

void loop () {
  Serial.print(F("sendSony 0x"));
  Serial.println(tData,HEX);
	for (int i=0; I < 3; i++) {
    irsend.sendSony(tData, 12);
    delay(40);
  }
  tData++;
  delay(500);
}
It prints the code to serial output, sends the code three times, then increments the code by 1 and repeats after 500ms. So I’ve opened serial monitor, put Arduino next to the speaker and just waited for something to happen.
And it did! At some point the input LED on the speaker turned on (which indicates that AUX input is selected). So I’ve stopped the program and found out that sending 0x299 caused that!.
0x299 in Hex corresponds to 1010011001 in binary, and given that we are sending 12 bit codes, the actual code send was: 0010 1001 1001.
I’ve decided to continue from 0x299 to find out other codes. The second hit was with play/pause button code: 0xA99 ⇒ 101010011001.
According to article about Sony remote codes, there should be a part of the code that identifies the device (device bits) and the other part with commands.
- For 12 bit code: 7 command, 5 device bits
- For 15 bit code: 7 command, 8 device bits
- For 20 bit code: 7 command, 5 device, 8 extended device bits

So looking at the bits above, I was sure, that my device doesn’t use 20 bit code. I had to decide if it uses 12bit or 15 bit and I had a hunch that it will be 15 bits (i’d repeat the procedure for 12 bit if that wouldn’t work, but as you will see - it was a good hunch).
Going with 15 bits would mean that first 7 bits would be for command and 8 last for device.
So I’ve updated my code table accordingly:

Now I new my device code is (10011001) and commands are 0000010* and 0001010. So I’ve updated my program to iterate over command bits using 15 bit codes.
#include <IRremote.h>
IRsend irsend;

void setup() {
  Serial.begin(115200);
}

unsigned long device = 155; // 155 is my device code in decimal
unsigned long command = 0; // we will start with command 0

void loop () {
  // code to send: shifting command by 8 bits to put device code there
  // the rest would be command bits
  unsigned long code = command << 8 | device;

  Serial.print(F("sendSony 0x"));
  Serial.println(command,HEX); // i'll just log the command

	for (int i=0; I < 3; i++) {
    irsend.sendSony(code, 15); // changed that to 15 bit
    delay(40);
  }
  command++;
  delay(500);
}
7 bits for command code leaves us with 127 commands to send. And guess what? BINGO, I’ve found all the commands :D
-
- according to http://www.righto.com/2010/03/understanding-sony-ir-remote-codes-lirc.html code is transmitted backwards so you should read it right-to-left. I ignored that for simplicity, but you should keep that in mind if you plan to use my codes in some other case (like with lirc or universal remote).
RM-AS1iP Remote codes
Sony IR transmission explained:
http://www.righto.com/2010/03/understanding-sony-ir-remote-codes-lirc.html
So RM-AS1iP uses 15 bit code (7 command bits and 8 device bits). 8 device bits are (1001 1001) And I’ve found the following codes:
| Command code (bin) | Command code (dec) | Function |
|---|---|---|
| 10100 | 20 | MUTE |
| 10 | 2 | Input change |
| 1010 | 10 | Play / pause |
| 100100 | 36 | Volume Up |
| 101010 | 42 | Previous track |
| 1000110 | 70 | Bass boost |
| 1001010 | 74 | Next track |
| 1010100 | 84 | On / Off |
| 1100100 | 100 | Volume down |
| 1110010 | 114 | Repeat |
| 11111 | 31 | Enter |
| 1111 | 15 | Up |
| 1001111 | 79 | Down |
| 10111 | 23 | Menu |
| ???? | ?? | Shuffle |
So the full message to be sent to device would be:
Command code for mute: 10100 (bin)
Device code: 10011001 (bin)
15 bit Command to send: 001010010011001
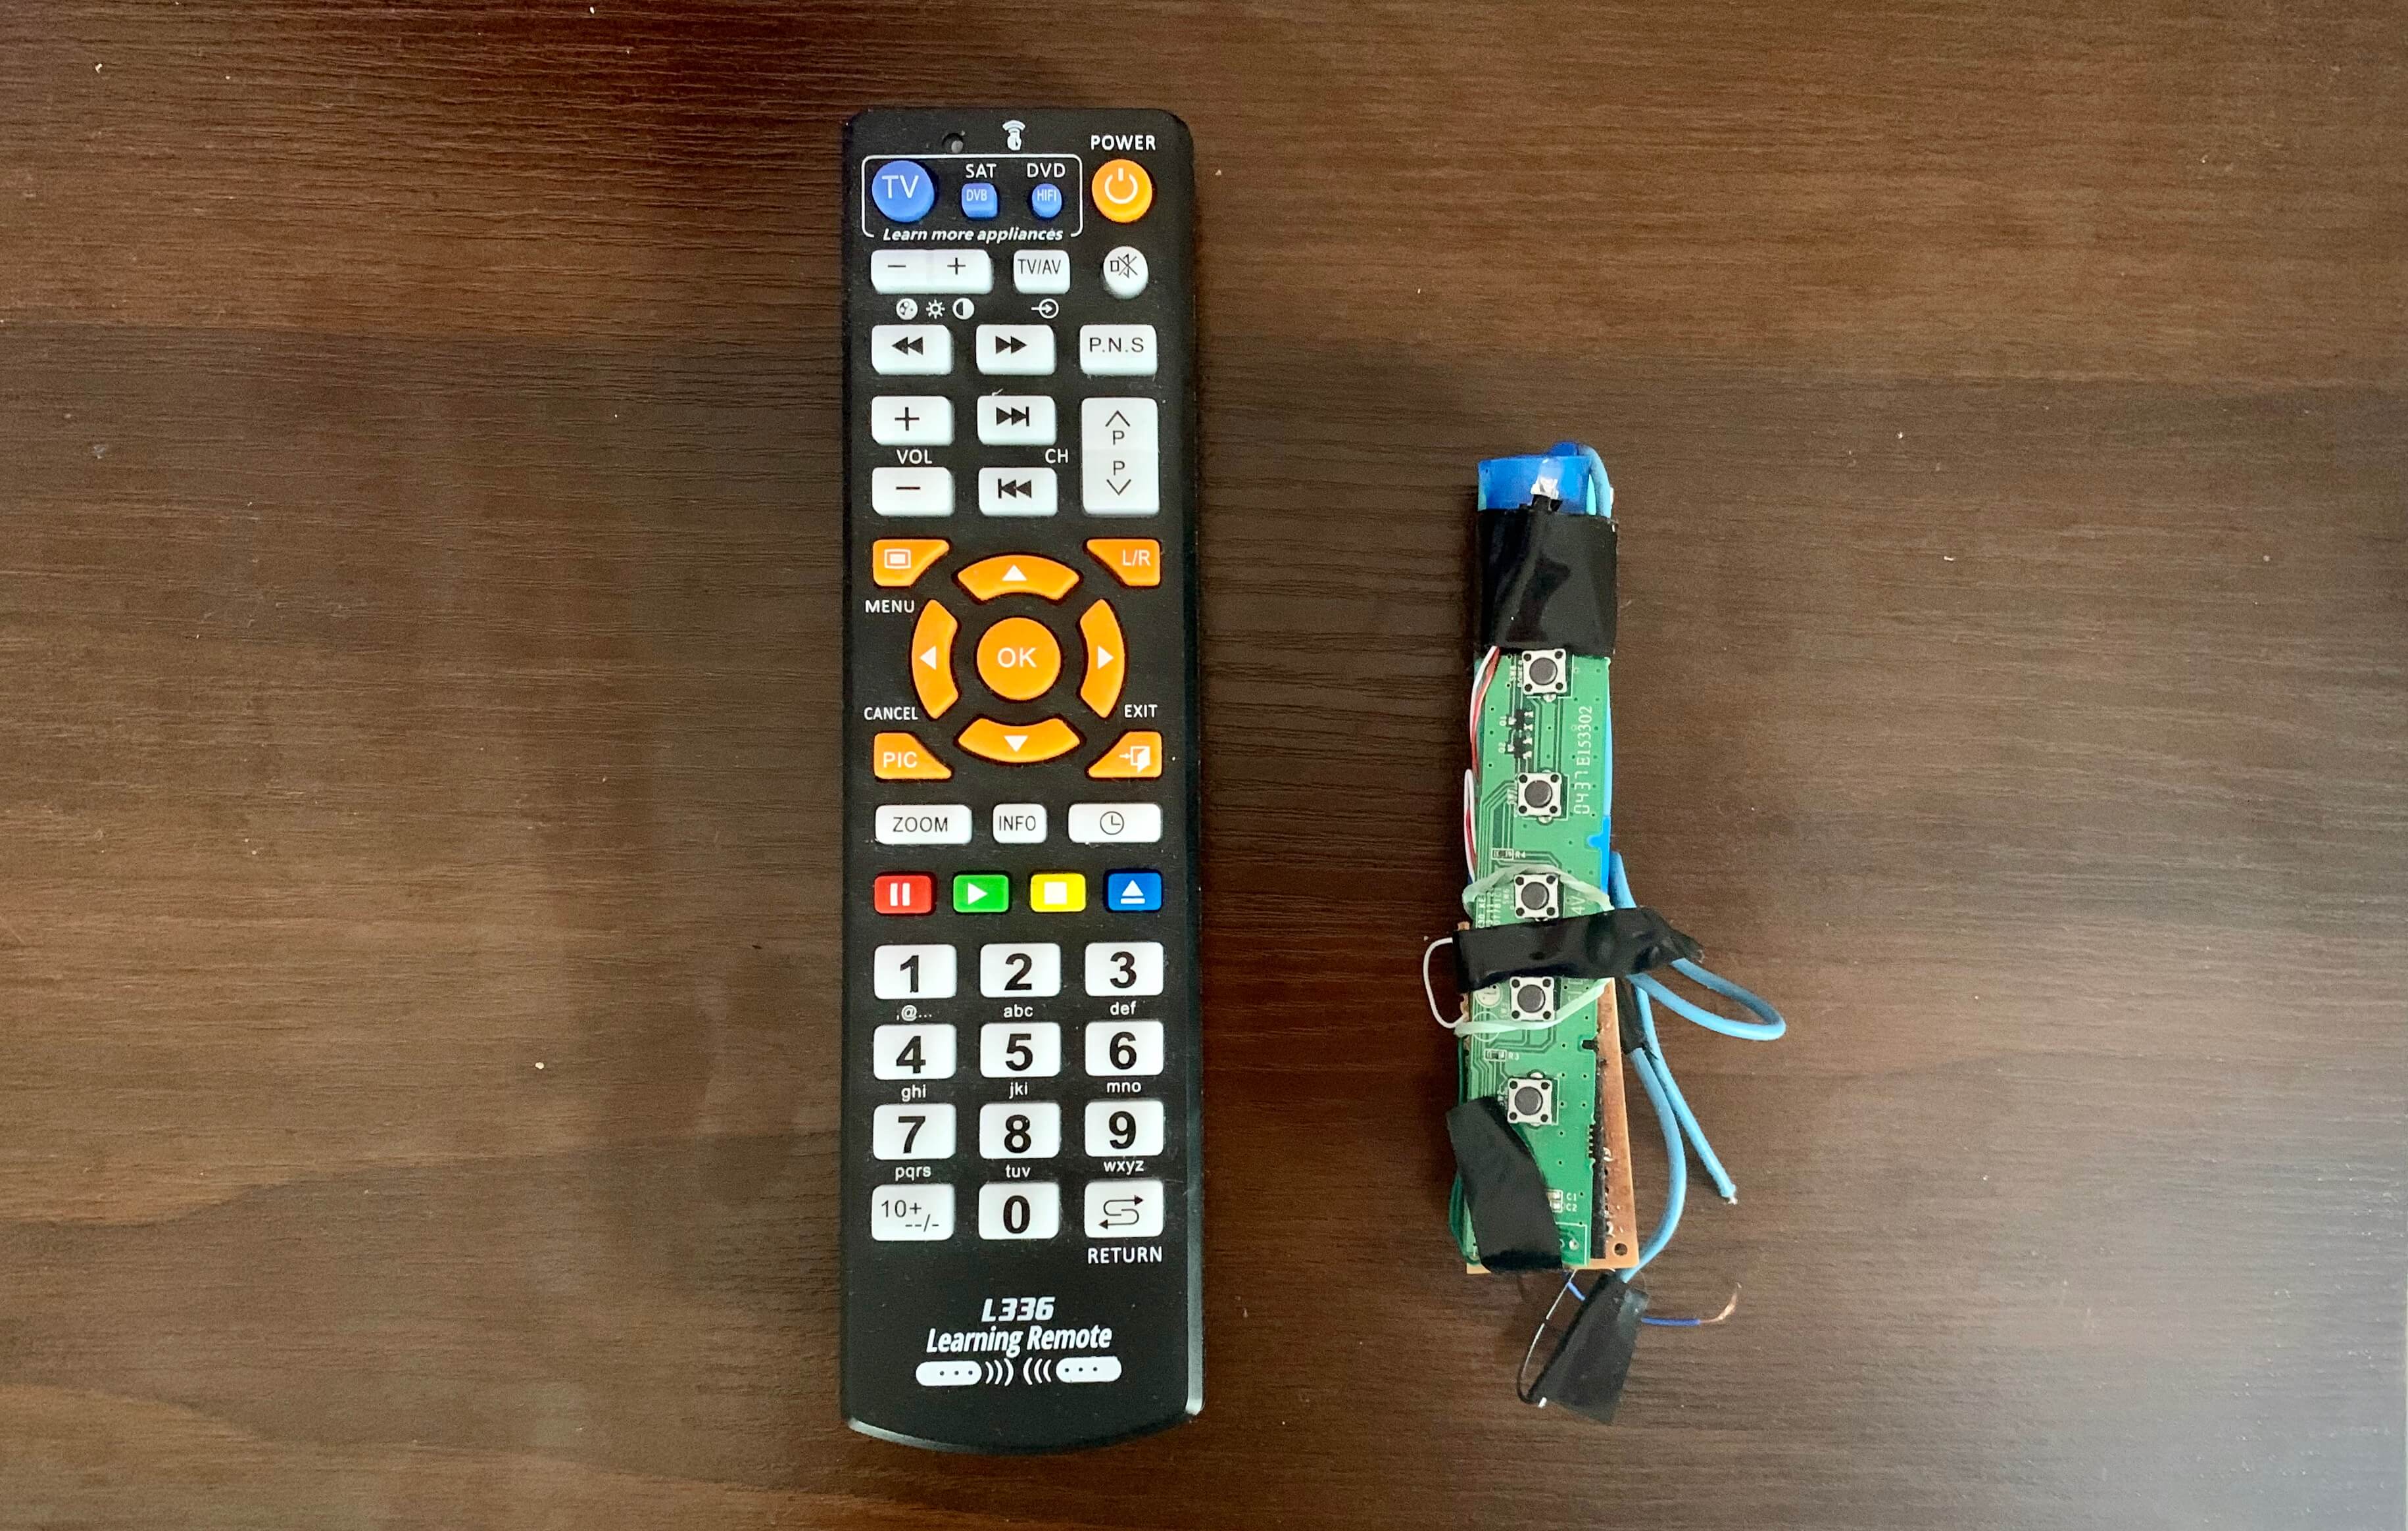
Now I have the codes. But I would also like to have the actual buttons to push (it is supposed to be a remote, isn’t it?).
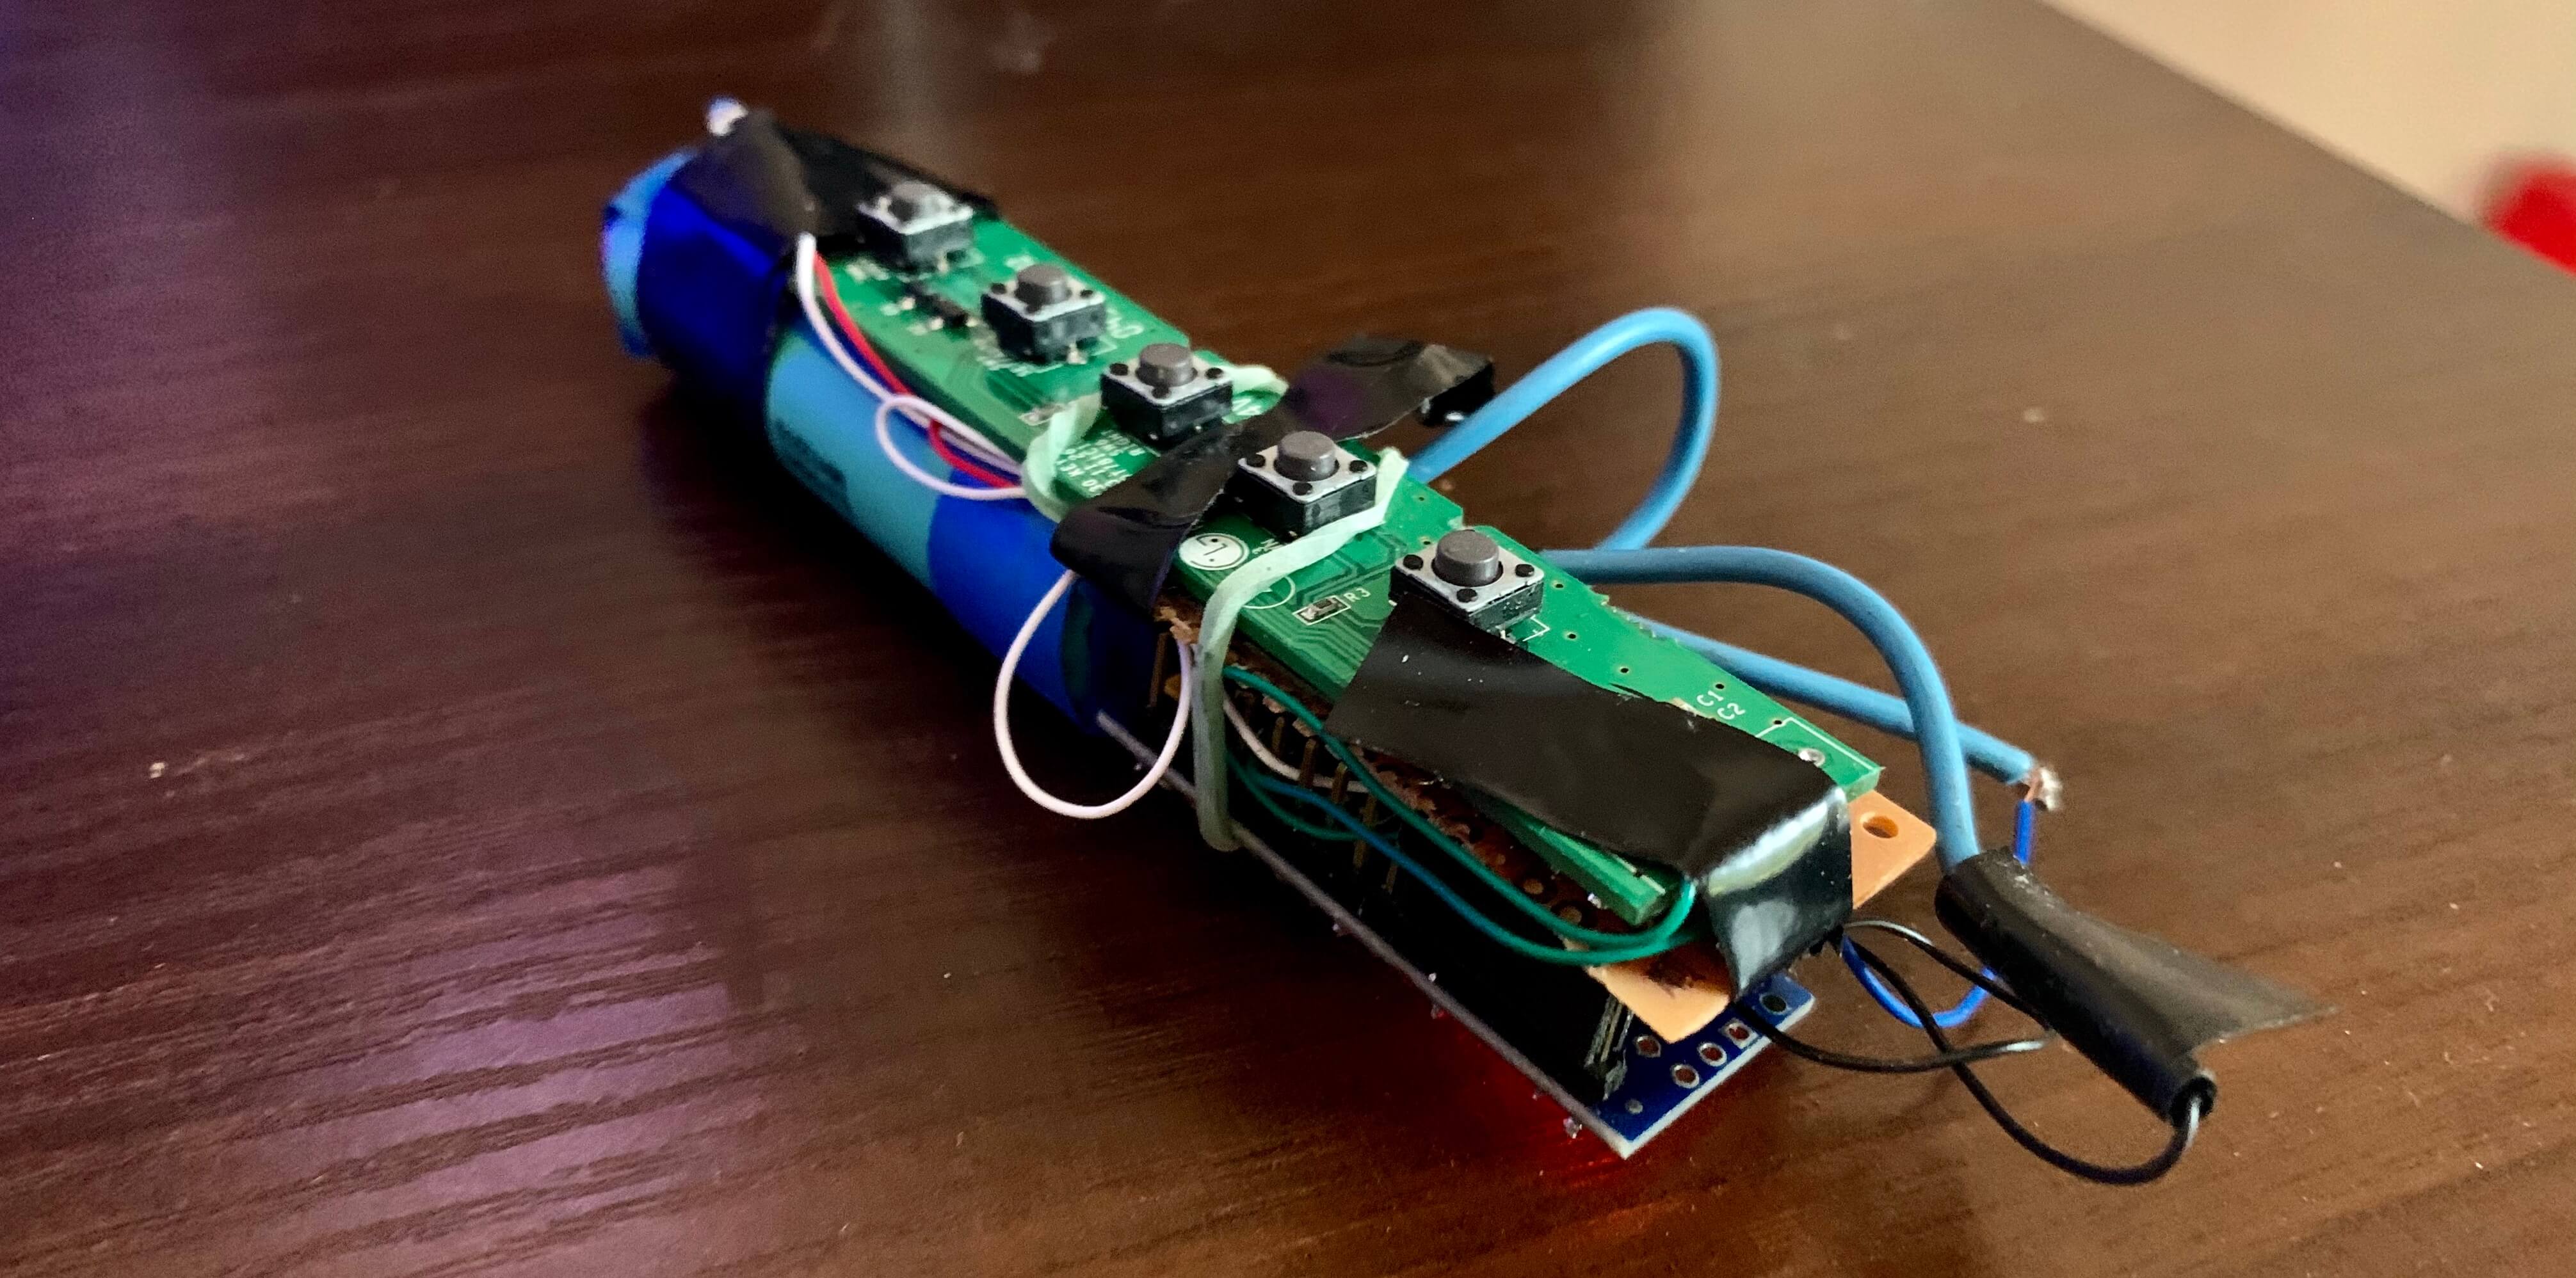
The actual hardware
To make an actual remote I needed to add keyboard and battery. I used parts that I had laying around:
- Arduino Nano
- Ir diode from old tv remote
- Board with 5 microswitches from old computer screen
- 3.7V 18650 Li-Ion cell from old laptop
I won’t go much into details as there are probably many tutorials about that already but I’ve:
- Connected Anode (+) of IR Diode to Arduino D3 and Kathode (-) to GND
- Found out microswitches board pinout with multimeter
- One of the pins pin should be ground (connect to Arduino GND)
- One pin should change resistance to ground when you press the button (connect it to Arduino A0 - analog input). More about keypads: http://www.martyncurrey.com/keypads/
- Connected 3.7V battery though switch to Arduino VCC and GND
Then I needed to program Arduino to handle keypress.
Software
So I had to alter my test program to actually be a remote. I had only 5 buttons and much more functions to handle, so I’ve decided to handle short and long presses so I could program 10 functions.
My program is consisted from two parts
- Interpret analog input signal to detect which button was pressed and if it was short or long press
- When button is pressed send a corresponding IR code
I’ve listed the code below. There are comments so it should be pretty self explanatory:
#include <IRremote.h>

// DEBUG_MODE enables diag messages on serial port
// #comm define DEBUG_MODE 1

// Sony keymap
#define POWER_ON_OFF 84
#define TOGGLE_INPUT 2
#define MUTE 20
#define PLAY_PAUSE 10
#define MENU 23
#define ENTER 31
#define VOL_UP 36
#define NEXT 74
#define VOL_DOWN 100
#define PREV 42

// not used:
#define BASS_BOOST 70
#define TRK_REPEAT 114
#define UP 15
#define DOWN 79

// Config
const byte keypadPin     = A0; // keypad analog pin
int deviceId = 153; // IR remote device id
IRsend irsend;

// Global Variables
int buttonDown = 0;
int buttonCount = 0;
unsigned long tData = 0x00;

void setup()
{
  #if defined(DEBUG_MODE)
    Serial.begin(115200);
    while (!Serial)   {  ;    }
    Serial.println(F("Start\n"));
  #endif
  // set the analogue pin for input and turn on the internal pullup resistor
  pinMode(keypadPin, INPUT_PULLUP);
}

void loop()
{
    int val = analogRead(keypadPin); // Reads resistance on keyboard pin
    int pressedButton = resistanceToButton(val); // Translates resistance to btn
    #if defined(DEBUG_MODE)
      Serial.println(val);
     #endif
    // IF there is button detected:
    if ( pressedButton > 0 ) {
      // if button was pressed on previous loop then increase counter
      if (buttonDown == pressedButton) buttonCount++;
      else {
        // else update button name
        buttonDown = pressedButton;
        buttonCount =  1;
      }

    } else {
      // if there was a button:
      if (buttonDown > 0) {
        // handle end of press
        int code = codeForButton(buttonDown, buttonCount >=4);
        // send code if detected
        if (code >0) sendCode(code);

        #if defined(DEBUG_MODE)
        Serial.print(F("Code "));
        Serial.println(code);
        #endif

        // reset button state:
        buttonDown = 0;
        buttonCount = 0;
      }
    }
    delay(100);
}

// Translates readed resistance value to button number
// r - resistance
int resistanceToButton(int r) {
 if (r >= 10 && r <= 20) return 1;
 if (r >= 60 && r <= 70) return 3;
 if (r >= 210 && r <= 220) return 5;
 if (r >= 240 && r <= 300) return 2;
 if (r >=309 && r <= 350) return 4;
 return 0;
}

// Returns SONY IR remote code
// int button - button number 1-5
// bool lngpress - true if that was a long press; false for short press
int codeForButton(int button, bool lngpress) {

  if(lngpress) {
    switch(button) {
      case 1:
        return TOGGLE_INPUT;
        break;
      case 2:
        return MENU;
        break;
      case 3:
        return MUTE;
        break;
      case 4:
        return NEXT;
        break;
      case 5:
        return PREV;
        break;
    }
  } else {
    switch(button) {
      case 1:
        return POWER_ON_OFF;
        break;
      case 2:
        return ENTER;
        break;
      case 3:
        return PLAY_PAUSE;
        break;
      case 4:
        return VOL_UP;
        break;
      case 5:
        return VOL_DOWN;
        break;
    }
  }

  return 0; // no command found
}

// Sends code with IR
// first 7 bits - command code
// next 8 bits represent deviceId
// SONY requires code to be sent at least 3 times with 40ms delay
void sendCode(int code) {
  tData = code << 8 | deviceId;
   for (int I = 0; I < 3; i++) {
        irsend.sendSony(tData, 15);
        delay(40);
   }
}
And it works!
Summary
It was fun to find out how remotes work and actually be able to figure out codes myself. Obviously my remote itself is very crude, it could be improved by introducing some energy saving, more buttons and minimizing its size (18650 cell is quite an overkill for a remote, button cell would be better). I could also use digispark / ATTiny85 instead of Arduino nano. But as I have a working remote now, I think i’ll just by a universal one with COPY feature and copy the codes to it. I could use the Arduino for something else, and wouldn’t have to worry about all those improvements. It would be still cost effective as those remotes are just a few bucks.